BlackVue DR970X-2CH 8MP 64GB Car Camera

BlackVue DR970X-2CH is discontinued - and replaced by BlackVue DR970X-2CH Plus
DR970X-2CH Plus is an improved version of the DR970X-2CH with new great features.
Read much more about it — and everything else — on the product page for the new version: DR970X-2CH Plus
We’ve kept the product page for the DR970X-2CH so you always have easy access to the documentation.
There is no reviews yet. Be the first to write us your opinion
You don’t need to look any further if you’re after the best camera for your car or truck. This camera does everything you need without compromising on design or reliability.
About the front camera (4K)
BlackVue’s front camera is truly one of the best car or truck cameras we’ve tested. It’s packed with great features like GPS, WiFi hotspot, microphone, a 3-axis accelerometer that can detect incidents and G-forces, a rear camera, Parking mode and much more, as you can see in the specs further down the page. Footage can be played back directly on your phone over WiFi or by moving the SD card to your computer and using the included software. In the software you get the full overview: you can view front camera + rear camera + location on Google Maps/road map at the same time and also see readings from different meters so you can tell how hard the vehicle braked, accelerated or turned. See a demonstration of these features in the video below.
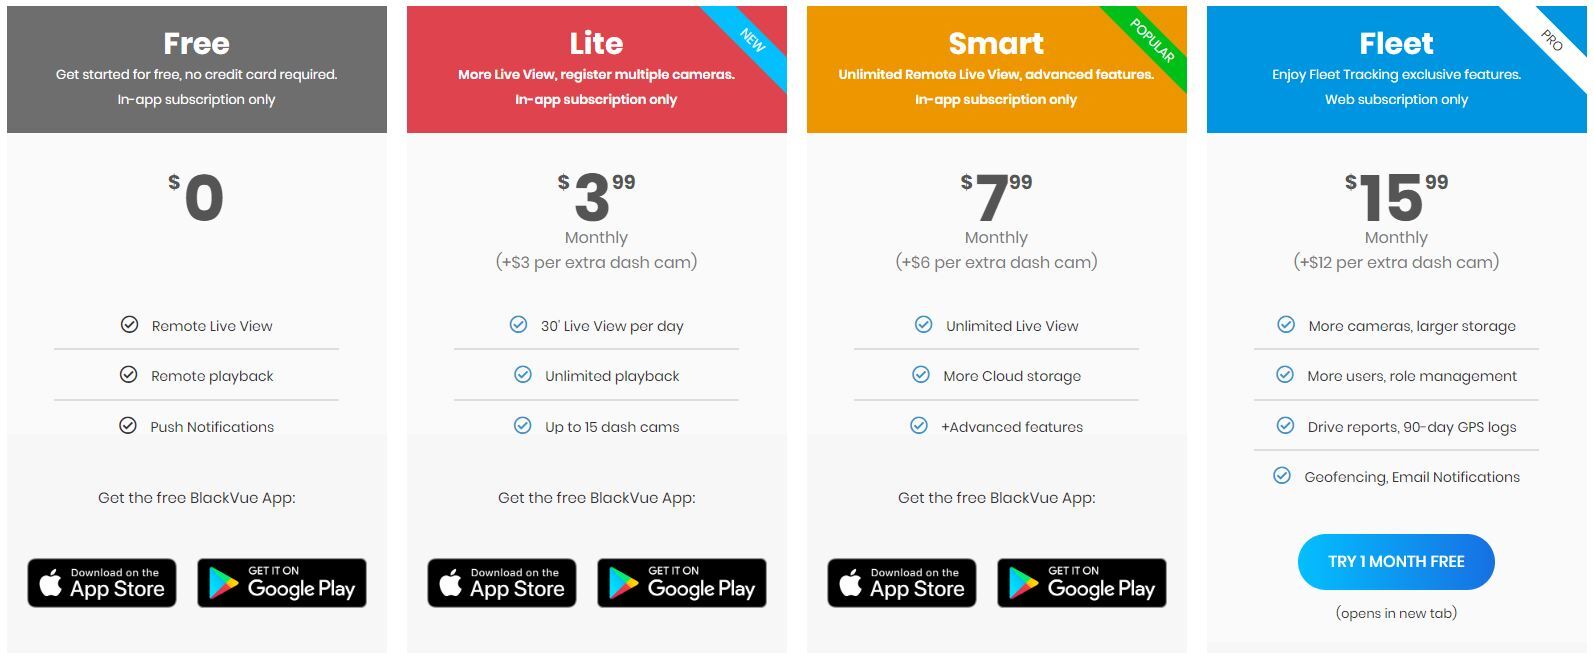
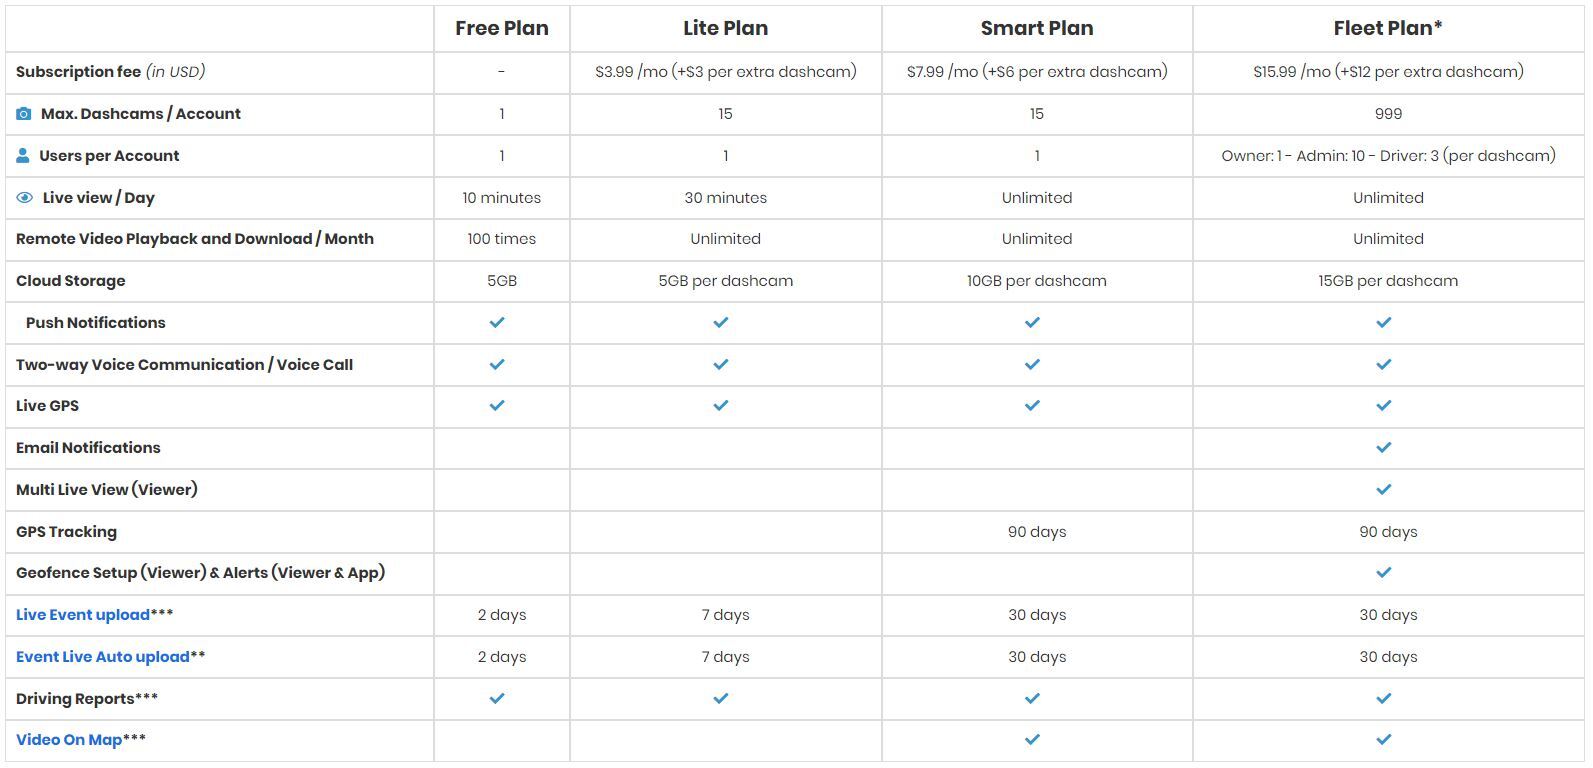
Recordings are in 4K (8MP) and can be played directly from mobile/tablet/PC or uploaded automatically to a cloud. The cloud storage is owned by BlackVue and there may be a fee to use it, but it’s only needed if you want automatic backup. The cloud is free for one camera per user - read more about the cloud here
Parking mode is definitely worth mentioning. The camera can also protect your vehicle while it’s parked. That means if the vehicle is hit while unattended, the camera records the event and locks the file.

WiFi and the microphone can be turned on and off separately. WiFi is turned off by pressing the button on the right end (as seen from the driver’s position) and the microphone is switched off by placing your hand near the left end of the camera by a sensor. Both actions are confirmed by voice: "Wifi/audio-recording enabled (activated) or disabled (deactivated)," and you can also see a WiFi symbol on the camera.

Recordings are saved in 4K using the H.265 format — so the large 4K files are compressed as efficiently as possible.
An LTE module can be purchased so the camera is always online and uploads recordings to the cloud
Cool features that also deserve a mention
-
Protection against overwriting: The camera records automatically and also automatically overwrites the oldest files so you don’t have to change the card or do anything to keep it running. BUT if an incident occurs, it’s great that those recordings aren’t overwritten. AND THEY ARE NOT, because the camera can detect an incident itself and “write-protect” the files leading up to the event. You can also lock files manually.
-
SD card error detection: SD cards can wear out and fail; if an error occurs and the camera can’t record, a voice alert will say: “Please check SD card.”
About the rear camera (Full HD)
The rear camera is mounted in the rear window (or, for example, the cabin in a taxi) and connects to the front camera. The front camera automatically detects the rear camera. To align it, you can have the app open on your phone while you rotate the camera into place. There’s a small discreet LED in the rear camera that makes it possible to check the status via the rearview mirror so you can be sure it’s powered on.
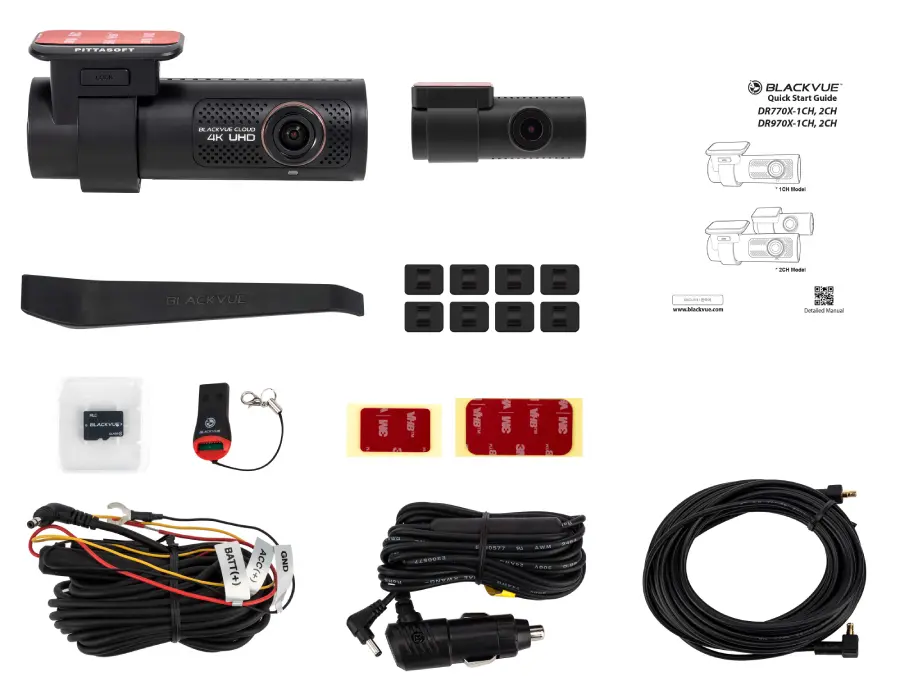
The kit includes:
- Front camera
- Rear camera
- 6-meter cable for the connection between front and rear camera
- MicroSD card 32GB (BlackVue)
- Power cable for permanent installation (hardwiring into the vehicle’s wiring)
- Power cable for temporary installation (cigarette lighter)
- MicroSD card reader (for use on PCs without a card reader/USB)
- Cable clips
- Double-sided tape for the mounting bracket
- Trim tool (easily hide cables behind trim)
- Quick start guide

About the installation:
It doesn’t take long to install the camera. There are two ways to connect it to power.
- Using the included cigarette lighter plug
- Directly into the vehicle’s wiring (If you need to know which wires to use, contact your local mechanic — they know this well. They can often do the installation too.)
The installation includes the following steps:
- Insert the SD card.
- Mount the front camera in the desired position (double-sided tape)
- Mount the rear camera in the desired position (double-sided tape)
- Run the cable from rear to front camera (the cable can almost always be tucked into the trim — see our videos)
- Connect power
- Download the app and set up the camera as you wish.
See an installation video here:
You can also read more about the camera on the manufacturer’s website by clicking here